May 2008 to July 2008
First light: August 1, 2008

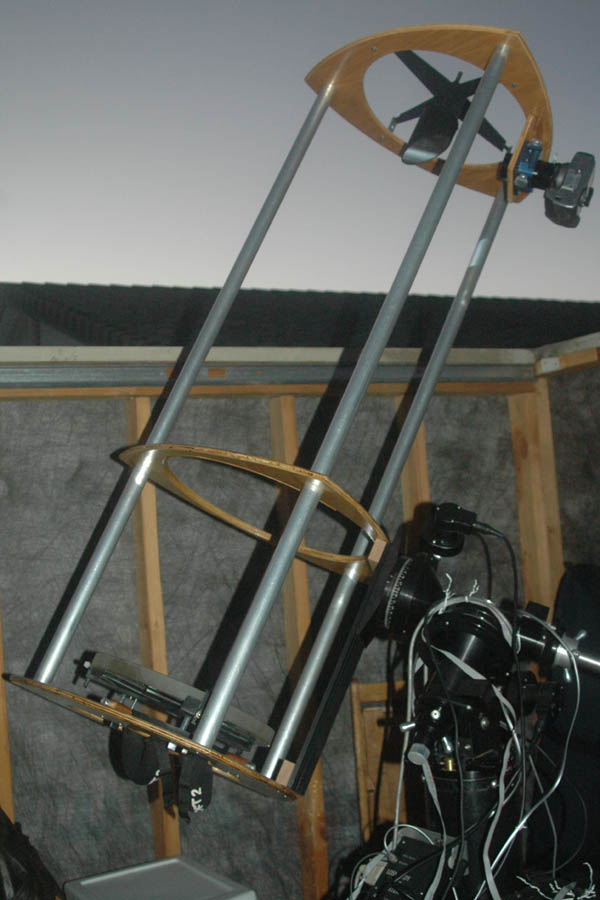
I had been avoiding “large” telescopes, because weight is critical to an astrophotographer, and I was worried about overtaxing my mount. Also, the price of mirrors goes way up once you get past 10” or so. Then I found an offer I couldn’t refuse, a 13.1” f/4.5 primary and matching 3.1” secondary mirror from a Coulter Odyssey scope. Normally, these go for about $600 on Astromart, but this one was only $400, and I jumped on it.
When it arrived, I was stunned at the size of the mirror. I’ve had only 8” telescopes to this point, and the 13” was clearly of a different scale of mirror entirely. For its size, the 13” primary was relatively light at 10.5#, because it’s only 1” thick. That alone made me start to think of this as a possible astrograph.
I wanted to keep the total weight of the OTA under 30# when fully assembled. The photo rig adds another 10# or so, and I didn’t want to approach the weight limit of my G-11 mount (which claims 60#).
I decided on a 3-tube style, for 3 reasons. First, I felt that it would be lightweight compared to an 8-pole truss design (either of which is lighter than a solid tube). Second, because the design calls for “just rings and tubes”, it would require minimal woodworking skill to execute. Finally, I like the spare-but-functional look of the design.
In order to add a personal touch, I decided to cut the rings in a Reuleaux triangle shape, instead of making them circular. The shape can be constructed with compass and straightedge, and also leaves a lot more “meat” of wood near the attachment points for the tubes, which seemed like a good idea.
The primary came with a mirror cell. The secondary came attached to an object that I refuse to give the title “spider” to, so I needed to order (or build) a spider. After playing with some designs that would have required me to build the spider, I decided to buy one, and that choice informed the rest of the upper tube assembly (UTA). Using The Book (Kreige and Berry’s excellent _The_Dobsonian_Telescope_) as a guide, I calculated that the hole in the upper ring should be 14.25” (which is enough to allow a 1degree FOV for the 13.1” scope). This effectively became the “inner diameter” of the “tube”, from which the rest of the scope was scaled to fit.
With the tube ID, I could order the spider, and also figure out how much wood to buy.
It turned out that 2 rings would fit on a quarter-sheet (2′x4′) of plywood. So, with 3 rings to make, I bought a quarter sheet of 1/2” Birch ply and a quarter sheet of 1/2” red oak ply. I bought the “cheap” stuff at my local home improvement store. I could have paid twice as much to get better ply from a specialty store, but given the abuse to which I put the wood, it would have been a waste of money, and I think that the ply I got looks fine, ’nuff said.
The parts list is pretty simple:
primary mirror
secondary mirror
mirror cell
spider and secondary holder
focuser
wood
tubes
screws, bolts, and brackets to hold it together
The scope took several weekends to build. If I’d been able to work on it straight through, it wouldn’t have
taken more than a week of work.

MOST COMMENTED
Observatory
Observatory 2.0 – Time has come today!
General / Maintenance
First Light, a deeper look
Mount / Observatory / Telescope
Observatory 2.0 – Result!
Observatory
Observatory 2.0 – The Pier goes in
Gear / General / Maintenance
Martin Farmer Wormblock installation notes
Deep Sky / Long Exposure Photography
NGC2244, The Rosette Nebula
Deep Sky / Long Exposure Photography
Another beautiful night.